
Yeti Blue Microphone Manual: A Comprehensive Guide
Navigating the Yeti’s features requires understanding gain control, polar patterns, and software integration like Blue VO!CE for optimal audio quality.
The Blue Yeti microphone stands as a popular choice for podcasters, streamers, musicians, and content creators seeking high-quality audio capture. This versatile USB microphone boasts multiple polar patterns, offering flexibility for diverse recording scenarios. From focused vocal recordings to capturing ambient sounds, the Yeti adapts to your needs. Its plug-and-play USB connectivity simplifies setup, while the built-in headphone jack enables real-time monitoring.
Understanding the Yeti’s capabilities, including gain adjustment and pattern selection, is crucial for achieving professional-sounding results. The microphone’s sensitivity and responsiveness, particularly in models like the Yeti X, require careful configuration to minimize noise and maximize clarity. This guide will provide a comprehensive overview of the Yeti’s features and functionalities.

Unboxing and Component Overview
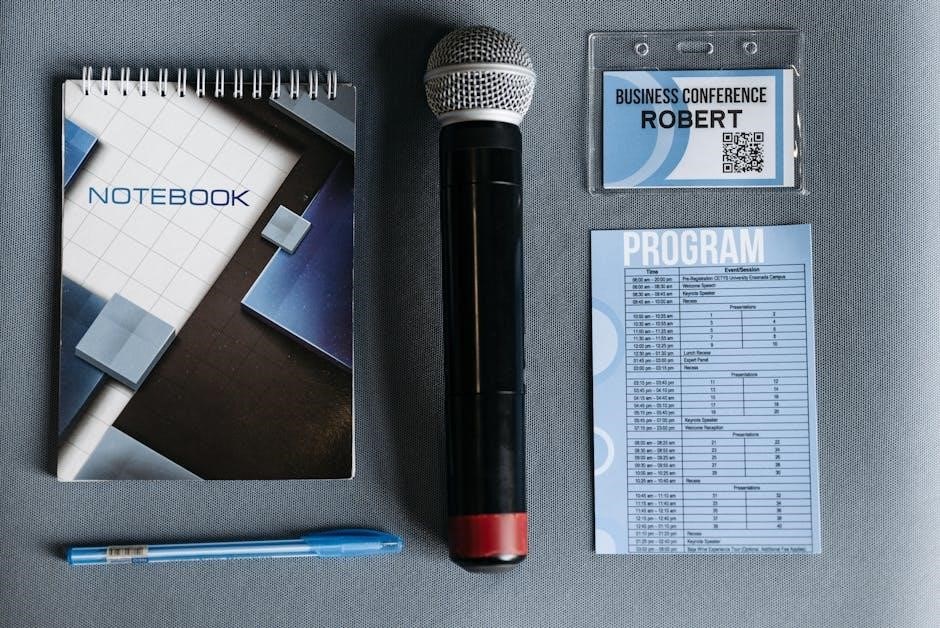
Upon unboxing your Blue Yeti microphone, you’ll find several key components. These typically include the Yeti microphone itself, a detachable USB cable, and a sturdy microphone stand. Some bundles may also include a pop filter and a shock mount, enhancing audio quality by reducing plosives and vibrations. Carefully inspect each component for any signs of damage.
Familiarize yourself with the microphone’s physical features, including the gain control knob, polar pattern selector, headphone volume control, and mute button. The Yeti X, a more advanced model, features an illuminated metering system for visual feedback. Proper component identification is essential for a smooth setup process and optimal performance.
Understanding Microphone Polar Patterns
The Blue Yeti’s versatility stems from its multiple polar patterns, each suited for different recording scenarios. Understanding these patterns is crucial for achieving optimal sound capture. Cardioid mode focuses on sound directly in front of the microphone, ideal for solo recordings. Stereo mode utilizes both left and right channels, creating a wider soundstage for instruments or ambient recordings.
Omnidirectional mode captures sound equally from all directions, suitable for conferences or group recordings. Finally, Bidirectional mode records from the front and back, perfect for interviews or duets. Experimenting with these patterns allows you to tailor the microphone’s sensitivity to your specific needs.
Cardioid Mode: Focused Recording
Cardioid mode on the Yeti Blue microphone is your go-to setting for solo vocal performances, podcasting, or instrument recording. It excels at isolating the sound source directly in front of the microphone while rejecting audio from the sides and rear. This focused capture minimizes background noise and room reverberation, resulting in a cleaner, more professional sound.
Position yourself closely to the microphone, ensuring your mouth is aligned with the Yeti’s capsule. Adjust the gain carefully to avoid clipping or distortion. Cardioid mode is particularly effective when recording in less-than-ideal acoustic environments, offering a significant improvement in audio clarity.
Stereo Mode: Capturing Width and Space
Stereo mode on the Yeti Blue microphone utilizes both the left and right microphone capsules to create a wide, immersive soundstage. This mode is ideal for recording acoustic instruments, ensembles, or ambient sounds where capturing spatial depth is crucial. It provides a natural and realistic representation of the sound source’s location and width.
Experiment with microphone placement to achieve the desired stereo image. Ensure the sound source is evenly distributed between the left and right capsules. Stereo mode is excellent for creating a sense of space and realism in your recordings, making it perfect for music production and field recording applications.
Omnidirectional Mode: Recording from All Directions

The Yeti’s omnidirectional mode captures sound equally from all directions, making it suitable for recording multiple sound sources simultaneously or capturing the ambience of a room. This mode is excellent for conference calls, interviews with multiple participants, or recording a full band playing live. However, it’s also more susceptible to picking up background noise and room reflections.
Position the microphone centrally within the group or sound source for balanced recording. Be mindful of room acoustics and consider using acoustic treatment to minimize unwanted reflections. Omnidirectional mode offers a natural and open sound, ideal for capturing a holistic audio environment.

Bidirectional Mode: Interview and Duet Recording
Yeti’s bidirectional mode, also known as figure-eight, records sound from the front and rear of the microphone, rejecting audio from the sides. This makes it perfect for face-to-face interviews, duets, or any scenario where two sound sources are directly opposite each other. Ensure both speakers are equidistant from the microphone for balanced levels.

Position the microphone so that each speaker addresses either the front or rear capsule. This mode effectively isolates the desired voices while minimizing room noise and unwanted sounds. It’s a valuable tool for creating focused and intimate recordings, ideal for podcasts or vocal collaborations.
Setting Up Your Yeti Microphone
Getting started with your Yeti is straightforward. Begin by unpacking all components and verifying their presence. Connecting to your computer is typically done via the included USB cable. Simply plug one end into the Yeti and the other into an available USB port on your computer – no USB hub is usually needed for optimal performance.
Next, ensure the necessary drivers are installed. Most modern operating systems will automatically detect and install the drivers upon connection. However, if prompted, or for advanced features, download the latest drivers from the Blue Microphones website. A successful connection will be indicated by a power indicator light on the Yeti.
Connecting to Your Computer (USB)
Establishing a USB connection is the primary method for utilizing your Yeti microphone. Locate the USB port on the rear of the Yeti – it’s a standard USB Type-B port. Connect the included USB cable to this port and the other end to a free USB-A port on your computer. Avoid using USB hubs initially, as they can sometimes limit power delivery and affect performance.
Upon connection, your computer should recognize the Yeti. A brief installation process may occur as the operating system loads the necessary drivers. Verify successful connection through your computer’s sound settings, ensuring the Yeti is selected as the default input device.
Installing Necessary Drivers
Generally, the Yeti Blue microphone is a plug-and-play device, meaning it often doesn’t require manual driver installation. However, if your computer doesn’t automatically recognize the microphone, or if you experience issues, you may need to install drivers.
Visit the Blue Microphones website and navigate to the support section. Locate the drivers specifically for the Yeti microphone and download the version compatible with your operating system (Windows or macOS). Run the downloaded installer and follow the on-screen instructions. After installation, restart your computer to ensure the drivers are properly loaded.
Gain Control and Sensitivity Adjustment
Proper gain control is crucial for optimal audio recording with your Yeti microphone. The Yeti and Yeti X differ slightly; the original Yeti features separate gain and headphone volume controls, while the Yeti X combines them into a single knob. Adjust the gain to match your voice level – too low results in quiet audio, while too high causes distortion.
Start with a low gain setting and gradually increase it while monitoring your audio levels. Aim for peaks around -6dB to -3dB to avoid clipping. Sensitivity adjustment, often linked to gain, impacts how much the microphone picks up ambient sound. Experiment to find the sweet spot for your recording environment.
Headphone Monitoring and Volume Control
Effective headphone monitoring is essential for real-time audio assessment during recording; The Yeti allows direct monitoring, meaning you hear your voice as it’s being captured, without latency. This helps identify issues like clipping or background noise immediately. The headphone volume control, separate on the original Yeti and combined with gain on the Yeti X, adjusts the loudness in your headphones.
Adjust the headphone volume to a comfortable level, ensuring you can clearly hear yourself without distortion. Monitoring allows for immediate adjustments to gain or microphone positioning, leading to a cleaner final recording. Proper monitoring prevents unwanted surprises during post-production.
Blue VO!CE Software Integration
Blue VO!CE software unlocks advanced customization options for your Yeti microphone, enhancing vocal clarity and adding professional effects. Downloading and installing Blue VO!CE provides access to features like noise reduction, compressor, de-esser, and EQ settings. These tools allow you to tailor the sound of your voice to suit various recording scenarios, from streaming and podcasting to voiceovers and music.
Customizing voice effects and presets within Blue VO!CE is straightforward. Experiment with different settings to find the perfect sound signature. Save your preferred configurations as presets for quick recall during future sessions, streamlining your workflow and ensuring consistent audio quality.
Downloading and Installing Blue VO!CE
To begin utilizing Blue VO!CE, navigate to the official Blue Microphones website and locate the downloads section. Ensure you select the version compatible with your operating system (Windows or macOS). The download is typically a small executable file that initiates the installation process.
Follow the on-screen prompts during installation, accepting the license agreement and choosing your preferred installation directory. The software may require a system restart to complete the setup. Once installed, launch Blue VO!CE, and it should automatically detect your connected Yeti microphone. If not, manually select it from the available devices within the software settings.
Customizing Voice Effects and Presets
Blue VO!CE offers a suite of customizable effects to enhance your voice recordings. Explore options like noise reduction, compressor, de-esser, and EQ to tailor the sound to your specific needs. Experiment with each effect’s parameters to achieve the desired clarity and warmth.
Create and save custom presets for different recording scenarios – gaming, podcasting, streaming, or voiceovers. This allows for quick switching between optimized settings. The software also includes pre-built presets for convenience. Regularly adjust settings based on your recording environment and personal preferences for consistently high-quality audio.
Troubleshooting Common Issues
If your Yeti isn’t recognized, ensure the USB cable is securely connected and try a different port. Check device manager for driver errors and reinstall if necessary. For low audio input, verify the microphone is selected as the default recording device in your system settings and adjust the gain control.
Background noise can be minimized by reducing gain, using a pop filter, and ensuring a quiet recording environment. Interference might stem from nearby electronic devices; try relocating the microphone. If issues persist, consult the Blue support website for further assistance and firmware updates.
Microphone Not Recognized by Computer
If your Yeti Blue microphone isn’t detected, begin by verifying the USB connection. Ensure the cable is firmly plugged into both the microphone and your computer. Try a different USB port, preferably a USB 2.0 port initially, as some devices have compatibility issues.
Next, check your computer’s Device Manager. Look for any errors or unrecognized devices. If the Yeti appears with a warning symbol, right-click and select “Update Driver.” If that fails, uninstall the device and reconnect it, allowing the system to reinstall the drivers. A restart may also be necessary.

Low Audio Input Level
Experiencing quiet recordings with your Yeti? The primary culprit is often the gain control. Slowly increase the gain knob on the microphone itself, monitoring the input level in your recording software. Avoid maxing it out, as this introduces unwanted noise.
Also, check your computer’s sound settings. Ensure the Yeti is selected as the default input device and that the input volume is appropriately adjusted. Within your recording application, verify the input level meter is responding to your voice. Remember, the Yeti X differs from the original Yeti, having combined gain and headphone volume controls.
Background Noise and Interference
Struggling with unwanted sounds in your recordings? First, experiment with different polar patterns. Cardioid mode minimizes background noise by focusing on sound directly in front of the microphone. Utilizing a pop filter and shock mount can significantly reduce plosives and vibrations.
Ensure the Yeti isn’t near electronic devices that could cause interference. Adjusting the gain too high amplifies noise, so find the sweet spot. Blue VO!CE software offers noise reduction features, but these can sometimes affect audio quality. Finally, consider your recording environment – a quieter space yields cleaner results.
Advanced Settings and Customization
Unlock the Yeti’s full potential with tailored settings! Dive into your computer’s sound settings to configure the sample rate and bit depth. Higher values (e.g., 48kHz, 24-bit) offer superior audio fidelity, but require more storage space. Experiment to find the balance for your needs.
Physical accessories enhance performance. A pop filter minimizes plosives (“p” and “b” sounds), while a shock mount isolates the microphone from vibrations. Explore Blue VO!CE for advanced customization, including EQ and compression. Remember, optimal settings depend on your voice and recording environment.
Sample Rate and Bit Depth Configuration
Optimizing audio quality begins with these settings! The sample rate dictates how many times per second audio is captured, measured in kHz. Common choices are 44.1kHz (CD quality) and 48kHz (professional standard). Bit depth determines the resolution of each sample, typically 16-bit or 24-bit.
Higher values mean greater fidelity. A 48kHz/24-bit configuration provides richer, more detailed sound, but demands more storage and processing power. Experiment to find the sweet spot for your recording needs. Access these settings through your computer’s sound control panel or within your recording software.
Using a Pop Filter and Shock Mount
Enhance your recordings with essential accessories! A pop filter minimizes plosive sounds – harsh “p” and “b” sounds – created by bursts of air. Position it a few inches from the microphone capsule. A shock mount isolates the Yeti from vibrations transmitted through your desk or stand, reducing unwanted rumble and noise.
These tools dramatically improve clarity. Securely attach the Yeti to the shock mount, ensuring a snug fit. Experiment with placement to find the optimal position for minimizing unwanted sounds. Investing in these accessories is a simple way to achieve professional-quality audio.
Yeti Microphone vs. Yeti X: Key Differences

The Yeti X builds upon the original Yeti’s foundation with notable upgrades; Primarily, the Yeti X features a four-capsule array versus the Yeti’s three, offering enhanced directionality and clarity. It also integrates Blue VO!CE software directly, providing real-time voice effects and customization without needing separate downloads.
The Yeti X’s gain control and monitoring are combined into one dial, simplifying adjustments. While the Yeti costs less, the Yeti X delivers superior audio quality and convenience, especially for streamers and content creators. The Yeti Pro offers XLR connectivity for professional setups.
Yeti Pro: A Professional-Grade Option
The Yeti Pro distinguishes itself with XLR connectivity, catering to professional audio recording needs. Unlike the USB-centric Yeti and Yeti X, the Pro allows connection to audio interfaces and mixers, offering greater control and flexibility in post-production. It boasts higher sample rates and bit depths, resulting in pristine audio quality suitable for music production and broadcast.
Lin Junjie, a prominent artist, utilizes the Yeti Pro with a Canon connector, highlighting its professional capabilities. However, for casual use or simple recording, the Pro’s advanced features might be unnecessary, making the standard Yeti or Yeti X more practical choices.
Skoda Yeti Electrical Issues (Related to Car Audio Systems)
Skoda Yeti owners have reported sporadic electrical faults, including doors locking/unlocking autonomously and dashboard illumination flickering. These issues can extend to the audio system, with reports of radio functionality being affected and file information not displaying during navigation, even with Traffic Program (TP) enabled.
A common problem involves the failure of a driver’s side window to operate from the door controls. A previous owner experienced a battery failure, potentially linked to these electrical anomalies. Bluetooth module integration for hands-free calling can also present challenges, requiring specific components for functionality.
Skoda Yeti Navigation and Bluetooth Connectivity
Owners of the Skoda Yeti with the older Amundsen navigation system (version V12) have noted issues despite having the latest SD card updates. While navigation generally functions correctly, the display of Traffic Program (TP) and real-time file information along routes can be unreliable, even when TP is activated in the radio settings.
Bluetooth integration for hands-free calling often requires a separate module installation. A user inquired about the necessary components for enabling this feature in a 2009 Yeti Ambition model. Successful Bluetooth connectivity is crucial for modern in-car communication and entertainment, but can be problematic without the correct setup.

Skoda Yeti Battery and Starting Problems
A common issue reported by Skoda Yeti owners involves battery failure, often presenting with strange sounds and flickering lights during startup. One owner experienced this with a 1.2 Active model, requiring battery replacement by roadside assistance. Subsequent issues haven’t surfaced after the replacement, suggesting a direct correlation between battery health and starting reliability.
Spontaneous locking and unlocking of doors, along with intermittent dashboard lighting failures, can indicate broader electrical system problems. A reported case also included a non-functional driver’s side window, all occurring suddenly within a three-day period, pointing to a potential electrical fault within the vehicle.
File Information and Radio Functionality in Skoda Yeti

Owners of Skoda Yetis with the older Amundsen navigation system have reported issues with file information display, even with the latest SD card version (V12) installed and Traffic Program (TP) enabled in both navigation and radio settings. Despite proper configuration, the system fails to display real-time traffic or file information along routes.
This suggests a potential software glitch or incompatibility within the Amundsen system itself, rather than a problem with the SD card or external traffic data sources. Users are experiencing a disconnect between the system’s settings and its ability to deliver expected functionality, impacting the navigation experience.
Skoda Yeti Pricing and Comparison with Other Models
When initially released, the Skoda Yeti’s pricing positioned it competitively, though still somewhat higher than comparable Ford Kuga models. However, it remained a more affordable option when contrasted against the significantly more expensive Volkswagen Tiguan. These price points reflected the Yeti’s features and intended market segment.
The Yeti’s value proposition lay in its blend of practicality, space, and affordability. While not the cheapest SUV available, it offered a compelling alternative to more premium options, attracting buyers seeking a well-rounded vehicle without exceeding their budget. This pricing strategy contributed to its initial success.
Winter Sports Preparation with Skoda Yeti
Preparing a Skoda Yeti for winter sports involves ensuring optimal functionality in challenging conditions. Though unrelated to microphone manuals, a well-maintained Yeti is crucial for safe travel. Checking tire pressure and tread depth is paramount, alongside verifying the functionality of all lights and wipers.
Antifreeze levels and battery health should be inspected before embarking on a winter journey. Carrying essential emergency supplies, like a shovel, blankets, and a first-aid kit, is also advisable. Proper vehicle preparation ensures a smooth and secure trip to the slopes, mirroring the need for a properly set-up Yeti microphone.