Grasslin digital timers, like the MIL 72/2 DIGI 42, offer 500 memory spaces for creating 50 date-dependent and independent programs, ensuring precise scheduling․
What is a Grasslin Timer?
Grasslin timers are sophisticated electronic time switches designed for a wide range of applications․ These devices, such as the DIGI 42 model, utilize digital programming to control electrical circuits based on pre-set schedules․ They boast extensive memory – up to 500 spaces – allowing for the creation of numerous, complex programs․
These programs can be date-dependent or independent, offering flexibility in scheduling on/off cycles․
Common Applications of Grasslin Timers
Grasslin timers find use in diverse settings, including building automation for lighting control, HVAC systems, and irrigation․ Their precise scheduling capabilities are ideal for agricultural applications, managing pumps and lighting cycles․ Industrial processes benefit from automated equipment control, and they’re also utilized in commercial environments for signage and display management․
The astronomical program functionality expands their utility further․

Safety Precautions
Before installation, turn off all circuit breakers to prevent electrical shock and damage to the timer․ Always prioritize electrical safety during setup and maintenance․
Electrical Safety Guidelines
Always disconnect power at the circuit breaker before working with the Grasslin timer to avoid potential electrical hazards․ Ensure the timer is properly grounded according to local electrical codes․ Never attempt repairs if you are not a qualified electrician․ Incorrect wiring can lead to fire or electric shock․ Verify the power supply matches the timer’s requirements (230V, 50Hz)․
Pre-Installation Checklist
Before installing your Grasslin timer, confirm the correct model for your application․ Gather necessary tools – screwdrivers, wire strippers, and a voltage tester․ Inspect the timer for any visible damage․ Verify the mounting location is suitable and provides adequate ventilation․ Ensure wiring meets local electrical codes and is appropriately sized for the load․ Turn off all circuit breakers before beginning installation․

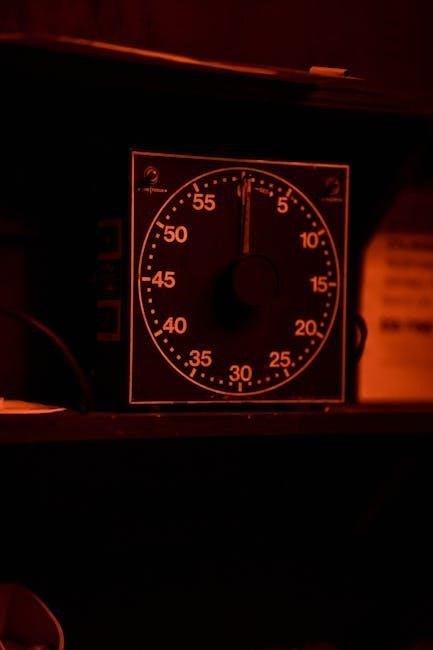
Understanding the Timer Interface
The Grasslin timer features a display, time dial, and buttons for programming․ Familiarize yourself with these key components to navigate settings and create schedules effectively․
Key Components and Buttons
The Grasslin timer’s interface includes essential buttons for operation․ The ‘TIME DIAL’ sets the current time, rotating only in the indicated direction to avoid errors․ Program buttons allow creation, review, and deletion of schedules․ A display shows the time, day, and programmed settings․ Understanding each button’s function is crucial for efficient programming and control of on/off cycles, enabling customized timing solutions for various applications․
Display Indicators and Symbols
The Grasslin timer’s display utilizes various indicators and symbols to convey operational status․ These include time-of-day displays, program numbers, and active program indicators․ Symbols denote specific functions like daily, weekly, or date-dependent programming․ Understanding these visual cues is vital for monitoring the timer’s settings and ensuring programs execute as intended, providing clear feedback on the current operational mode and scheduled events․

Setting the Clock
To accurately set the time, turn the TIME DIAL in the direction of the arrow; avoid reversing it for precise time-of-day alignment․
Setting the Time of Day
Begin by ensuring the timer is powered on․ Locate the TIME DIAL on the timer face – it’s typically large and white․ Carefully rotate the dial, following the direction indicated by the arrow, to align with the current time․
Crucially, avoid turning the dial in the reverse direction, as this can disrupt the internal mechanism and require resetting․ Double-check the alignment to guarantee accuracy before proceeding to program schedules․
Adjusting for Daylight Saving Time
The Grasslin timer’s manual details how to accommodate Daylight Saving Time (DST) adjustments․ Typically, this involves accessing the settings menu and enabling or disabling the DST function․ The timer will automatically advance or retract the time by one hour, as programmed․
Remember to consult the specific model’s instructions, as the exact procedure may vary․ Proper DST configuration ensures accurate scheduling throughout the year, avoiding timing errors in your programs․

Programming Basic On/Off Schedules
The manual guides users through creating simple daily programs, defining on and off times․ Date-dependent programs are also possible, utilizing the timer’s memory spaces․
Creating a Simple Daily Program
To establish a basic daily schedule, access the programming mode on your Grasslin timer․ Define the desired on-time by setting the hour and minute․ Subsequently, program the off-time following the same procedure․ Ensure the correct day selection is active for daily repetition․ The timer’s interface allows for precise minute-level adjustments, facilitating tailored scheduling․ Remember to save the program to activate it, ensuring consistent operation according to your defined parameters․
Setting Date-Dependent Programs
Grasslin timers excel with date-dependent programming, utilizing their 50 memory spaces․ First, input the specific date for the program’s activation․ Then, define the on and off times, mirroring the daily program setup․ Crucially, select the appropriate date-dependent function within the timer’s menu․ This allows for unique schedules on specific days, ideal for varied operational needs․ Save the program, verifying the date and times for accurate execution․
Advanced Programming Features
Grasslin timers boast 50 memory spaces and astronomical program functionality, enabling complex scheduling based on sunrise and sunset times for automated control․
Utilizing the 50 Memory Spaces
Grasslin timers provide 50 distinct memory spaces, allowing users to create and store numerous independent and date-dependent programs․ This extensive capacity facilitates complex scheduling scenarios, accommodating diverse operational needs․ Each memory space holds a unique on/off schedule, enabling precise control over various applications․ Effectively utilizing these spaces maximizes the timer’s flexibility and automation potential, streamlining operations and reducing manual intervention․
Astronomical Program Functionality
Grasslin timers feature an astronomical program, automatically adjusting on/off times based on sunrise and sunset․ This eliminates manual adjustments for seasonal changes, ensuring optimal lighting or equipment control․ The timer calculates these times based on geographical location, providing accurate scheduling․ This functionality is ideal for outdoor applications, maximizing energy efficiency and automating operations aligned with natural daylight cycles․
Reviewing and Editing Programs
Grasslin timers allow access to existing programs for review and modification of settings․ This ensures schedules can be easily adjusted to meet changing operational needs․
Accessing Existing Programs
To view programmed schedules on a Grasslin timer, navigate through the memory spaces using the appropriate buttons․ The manual details how to cycle through the 50 available memory locations, displaying the on/off times and date parameters for each program․ Careful review allows users to confirm settings before execution․ The display indicators clearly show the active program number and associated parameters, facilitating easy identification and modification as needed․ This process ensures accurate scheduling and control․
Modifying Program Settings
Once a program is accessed, the Grasslin timer manual explains how to adjust individual settings like on/off times, days of the week, and date parameters․ Utilize the timer’s buttons to increment or decrement values, ensuring precision․ Save changes after each modification to avoid losing data․ The display provides real-time feedback during the editing process, confirming the new settings before final storage․ Review thoroughly to guarantee the program functions as intended․
Deleting Programs
The manual details how to remove unwanted schedules individually or clear all programs at once, freeing up memory spaces for new configurations on the timer․
Removing Unwanted Schedules
To delete specific programs, access the existing program list using the timer’s interface․ Navigate to the program number you wish to remove and follow the designated deletion procedure outlined in the manual․ This typically involves pressing a specific button combination or selecting a ‘delete’ option within the menu․ Confirm the deletion to permanently remove the schedule, ensuring the timer operates according to your updated preferences․
Clearing All Programs
The manual details a function to completely clear all programmed schedules from the Grasslin timer’s memory․ This resets the device to its factory default settings, removing all existing on/off programs․ Exercise caution when using this feature, as all customized settings will be lost․ Confirm the action to ensure a completely fresh start for new programming endeavors․
Troubleshooting Common Issues
If the timer displays an incorrect time, or a program fails to execute as programmed, consult the manual for specific diagnostic steps and solutions․
Timer Not Displaying Correct Time
When the Grasslin timer shows an inaccurate time, ensure the TIME DIAL is adjusted correctly, turning it only in the direction of the arrow – reversing it can cause errors․ Verify the correct time of day aligns with the dial’s markings․ If issues persist, review the manual’s clock setting instructions, confirming proper procedure and considering daylight saving adjustments․ A reset might also be necessary․
Program Not Executing as Expected
If a programmed schedule isn’t running as intended, first access existing programs to meticulously review the settings for errors․ Confirm the correct start time, days of the week, and on/off durations are programmed․ Double-check date-dependent programs for accurate date entries․ Refer to the manual for detailed programming steps and ensure no conflicting schedules exist within the 50 memory spaces․

Technical Specifications
The Grässlin MIL 72/2 DIGI 42 operates at 230V, 50Hz, with a minimum switching time of 1 minute and programmable to the minute․
Power Supply Requirements
Grässlin timers, specifically models like the MIL 72/2 DIGI 42, are designed to operate with a standard 230V AC power supply at a frequency of 50Hz․ It’s crucial to verify your local power supply matches these specifications before installation․ Incorrect voltage can cause damage to the timer or pose a safety hazard․
Switching Capacity
Grässlin timers are equipped with internal relays capable of handling various load types․ The switching capacity varies by model, but generally supports standard lighting and electrical devices․ Always confirm the connected load does not exceed the timer’s specified maximum current and voltage ratings to prevent overheating and potential failure of the switching contacts․

Maintenance and Care
Regularly clean the timer with a soft, dry cloth․ If applicable, replace the battery promptly to maintain accurate timekeeping and program functionality․
Cleaning the Timer
To ensure optimal performance and longevity of your Grasslin timer, regular cleaning is recommended․ Always disconnect the timer from the power supply before commencing any cleaning procedures․ Use a soft, dry cloth to gently wipe the exterior surfaces, removing any dust or debris;
Avoid using abrasive cleaners, solvents, or excessive moisture, as these can damage the timer’s casing and internal components․ For stubborn dirt, lightly dampen the cloth with water, ensuring it is thoroughly wrung out before use․
Battery Replacement (if applicable)
Certain Grasslin timer models may utilize a battery for memory backup during power outages․ If your timer features a battery, it will need periodic replacement to maintain program retention․ Consult your specific model’s manual for the correct battery type and replacement instructions․
Typically, a low battery indicator will appear on the display․ Carefully open the battery compartment, replace the old battery with a new one of the same type, and securely close the compartment․
Grasslin Timer Models Overview
Grasslin offers diverse timers, including the MIL 72/2 DIGI 42 with astronomical programs, and other variants featuring daily, weekly, or combined scheduling options․
MIL 72/2 DIGI 42 Model Details
The Grässlin MIL 72/2 DIGI 42 is a sophisticated digital timer boasting 500 memory spaces․ It supports the creation of up to 50 programs, both date-dependent and independent, offering exceptional flexibility․
This model operates on a 230V, 50Hz power supply, with a minimum switching time of 1 minute and programmable intervals down to the minute․ It features an astronomical program alongside daily and weekly options․
Other Popular Grasslin Timer Variants
Beyond the MIL 72/2 DIGI 42, Grasslin offers a diverse range of timers․ Electronic timers, like those readily available, provide reliable scheduling solutions․ The HM Digital EC-3, while an EC meter, demonstrates Grasslin’s broader product line․
These variants cater to diverse needs, from simple on/off cycles to complex astronomical programs․ Each model maintains Grasslin’s commitment to precision and user-friendly programming, ensuring optimal control․

Resources and Support
Access the official Grasslin manual online for comprehensive programming guidance․ Direct support is also available through Grasslin’s official channels for assistance․
Finding the Official Grasslin Manual
Locating the official Grasslin timer manual is crucial for understanding its advanced features and ensuring correct programming․ While a direct link isn’t provided in the source material, searching online using specific model numbers – such as “Grasslin MIL 72/2 DIGI 42 manual” – will yield results․
The manual details creating new programs, reviewing existing ones, and deleting schedules․ It also covers essential functions like setting the clock display to 12- or 24-hour format․
Contacting Grasslin Support
Unfortunately, the provided text snippets do not contain direct contact information for Grasslin support․ However, given the complexity of programming these timers – offering 500 memory spaces and astronomical functionality – seeking direct assistance may be necessary․
Users should explore the official Grasslin website for contact details, including phone numbers or email addresses, to resolve specific issues or obtain clarification on manual instructions․